
We spent 8 months on the road before we decided to invest in a solar system for RV boondocking. When we decided we were ready to spend more time camping off the grid in national forests and on public lands, our top priority was getting setup to power our RV with solar energy.
Our energy needs are pretty high because my wife works full time and our 2 kids do some of their homeschool lessons online. On the other hand, our rig is smaller than many families’ setups, with a 25-foot footprint and basic RV appliances (as opposed to the residential appliances found in some larger models) balancing out our energy consumption.
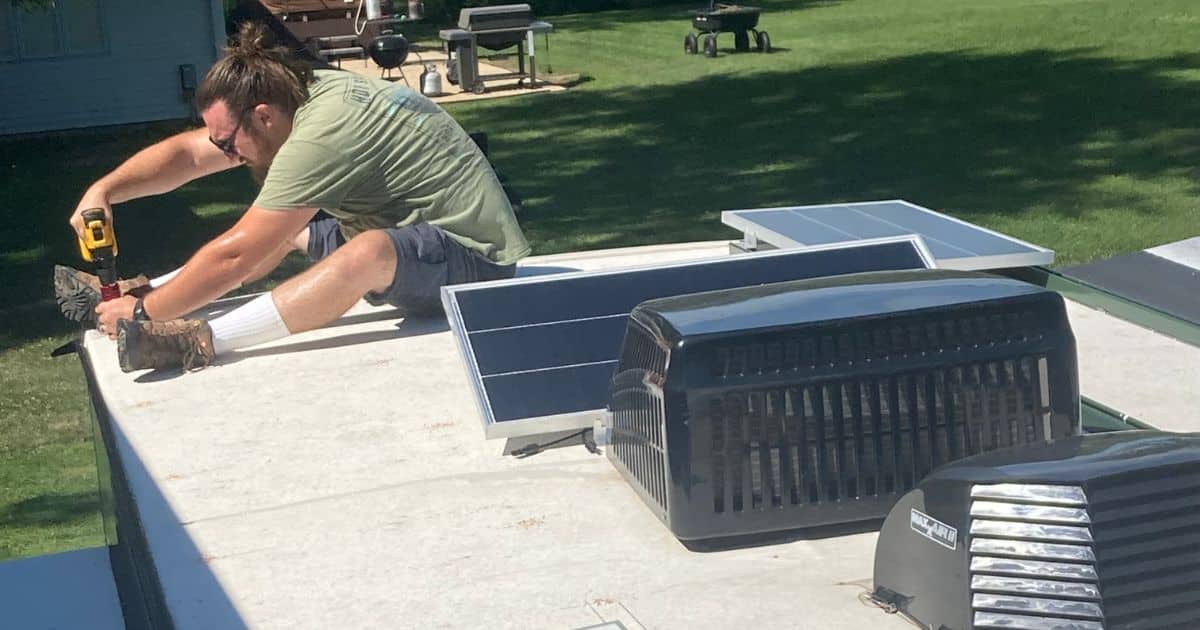
We couldn’t afford to hire a professional to install solar on our RV, so I decided to do it myself. While DIYing solar energy in an RV is a big job, with DIY skills, a respect for electricity, and a willingness to learn as you go along, it’s definitely achievable. And it’s been a huge success! We’ve been powering our lifestyle completely off the grid for 2 months now.
Throughout the rest of this article, I’ll dive into a step-by-step guide of the things you need to do to get setup with solar power in your RV. My goal is to give you the information you need to feel confident that you too can DIY a solution to power your RV with energy from the sun. Let’s get started.
1. Research
Make sure solar power is right for your situation.
A solar system isn’t required to power your RV. If you plan to spend most of your camping time in RV resorts or state and national park campgrounds that offer electric hookups, investing in a solar setup might not make sense for you. And if you aren’t planning to travel full time (or at least a significant amount of time), you might be better off purchasing a generator.
For us, investing in solar power made a whole lot of sense because we’re a full time traveling family with big plans to spend at least a couple years camping off the grid on public lands out west. Having solar on board means we have much more flexibility with where we can camp and it brings down the amount we have to spend on campsites pretty significantly.
Be realistic about your budget.
The cost of solar power for your RV varies widely based on factors like:
- How much energy you need to generate
- The quality of the components you choose
- Whether you’re going to hire a professional or do-it-yourself
- How much you’ll need to spend on tools for the job that you don’t already have

Do your homework on what it takes to DIY solar power.
Installing solar power on your RV is definitely achievable, especially if you’re an avid DIYer. If you’re mechanically-inclined, have plenty of patience, and have a basic understanding of electricity (and a healthy respect for it), you can handle a DIY RV solar install. Be honest with yourself about your abilities.
And even if you think you’re a good fit for the project, do yourself a favor and keep researching. Keep reading articles (like the one you’re reading right now!), watch YouTube videos that are more specific to installing solar on your particular RV model, and explore online forums (like Facebook groups or Reddit) to get a firsthand look at others’ experiences.
2. Planning
Calculate how much solar power you need.
To calculate how much solar power you need for your rig, you have to understand how much energy you consume throughout the day. While the most accurate way to gauge your energy usage is to monitor the energy you consume in your RV while plugged into an electric hookup (using a power monitoring tool like this one), I chose to estimate instead. Our surge protector didn’t have a power monitor option and I didn’t want (or need) to purchase something new because I had a pretty good understanding of what we actually use day-to-day in our RV after living in it for almost a year.
The easiest way to estimate how much energy you consume is to take a look at all the appliances you use. Each one will have a sticker on it that tells you exactly how many watts of power it consumes. (If you can’t find that sticker, look up the owners’ manual online to find the information you need.) The watts listed on the sticker are also equal to watt hours. So, if Starlink’s sticker lists 75 watts, that equates to 75 watt-hours (or consumption of 75 watts in an hour or 1,800 watts in a 24-hour day).
Here’s a table that I put together to illustrate how I calculated our energy consumption. Remember: these numbers are specific to our unique appliances. Unless we have the exact same appliances (which we don’t), your numbers will vary, so make sure to check your own stickers and owners’ manuals.
The table below shows all the things that consume energy in our camper and how much energy they consume (watts) in a period of time (watt-hours) and the watts that each would consume if we were to use it continuously for a full 24-hour period. Of course, we don’t leave the lights on or use the computer at full capacity all day long. But the sun doesn’t shine for 24 hours a day either. Using a whole day’s worth of energy is the easiest way to calculate our consumption.
| Our Appliances (yours will vary) | Watts | Watts Consumed per Day (watts x 24 hours) |
|---|---|---|
| iMac Computer | 262 | 6,288 |
| Laptop Charger | 85 | 2,040 |
| Phone Chargers (x4) | 80 | 1,920 |
| Starlink Internet | 75 | 1,800 |
| Exhaust Fan | 60 | 1,440 |
| Indoor Camper Lights (x10) | 50 | 1,200 |
| Inverter | 50 | 1,200 |
| Corded Fan | 18 | 432 |
| Refrigerator* | 10 | 240 |
| TOTAL | 690 | 16,560 |
*Our refrigerator can be run using propane or 120-volt electricity. Without propane, the fridge would consume 440 watts of energy per hour (or 10,500 watts per day). That’s a lot. Instead, we run the fridge using propane, which takes its solar consumption down to 10 watts or 240 watts per day. Much better.
This topic can be hard to grasp, especially if you aren’t an electrician (I’m not an electrician either). I think this article does a good job of explaining this concept in more detail if you’re ready to learn more.
Determine how much solar equipment you need.
Once you’ve identified how much energy you need to power your appliances while RV boondocking, the next step is determining how many panels (and of what size) you need to install. We needed enough solar panels to meet our energy demands (690 watts) so I installed 8 100-watt solar panels. If you’re consuming 350 watts of energy at full capacity, you’ll want enough solar panels to produce 400 watts of energy. And so on.
Now, you might be saying: but how often are y’all really using every single one of your appliances at full capacity? And that’s a fair point. But remember: solar panels only generate energy when the sun is shining. And we don’t stop using electricity when the sun goes down. The chart below illustrates that the power our panels generate throughout the day fluctuates.
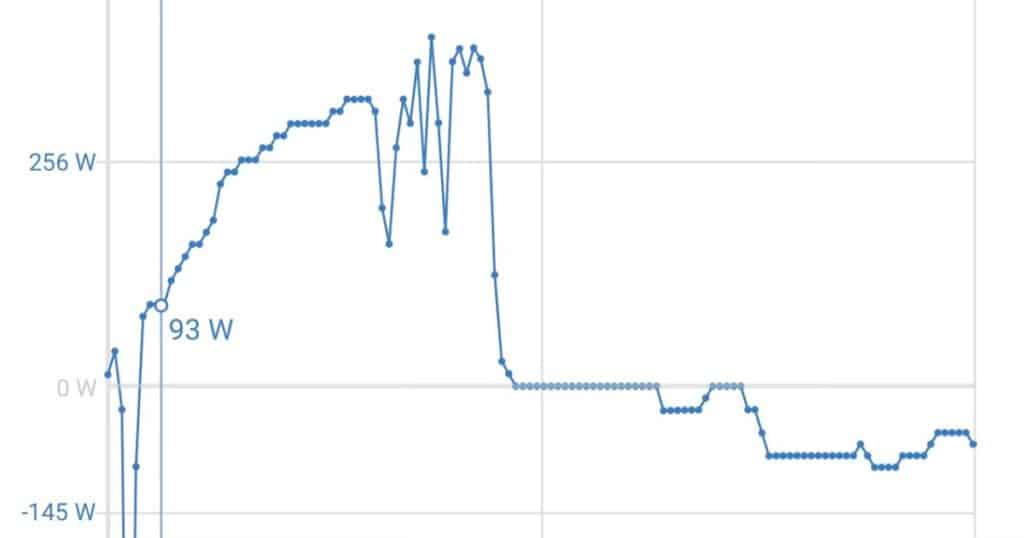
To be conservative, you’ll want to make sure you have enough solar panels to generate more watts of energy than what your appliances consume. What happens if your solar panels produce more energy than you’re consuming at any given time? That’s how your battery (which we’ll cover in a later section) gets charged, enabling you to use stored solar energy when the sun isn’t available (i.e. at night, on cloudy days, or in a dense forest).
Stay within the limits of your RV.
Remember: it’s not just about the amount of energy that you need to produce. You also have to make sure that you have enough real estate on your rig to place the amount of solar panels that you need.
It’s possible that you could find yourself in situation where your energy demands require 8 solar panels, but you’ve only got enough room on the roof for 6 panels. Or maybe you’ve already got so much cargo on board your RV that you’re above your Gross Vehicle Weight Rating (GVWR). Bringing solar panels in could put you overweight and cause all kinds of trouble.
If you find yourself in one of these situations, do some troubleshooting in advance. Maybe you need to do something like:
- Find ways to reduce your energy consumption
- Reduce the weight of other cargo on board your rig to make room
- Create more space on the roof using a custom solution (i.e. double-stacked sliding panels – this can get pricey)
- Look at solar panel options that don’t require mounting to a roof
Get the monthly newsletter.
Spam sucks. So don’t expect any from us! Once a month, we’ll send you personal stories and photos from our travels to inspire you to get wild.
3. Preparation
Research and order all the components you’ll need.
Obviously, you need enough solar panels to meet your energy consumption needs. There are lots of sizes, styles and brands of solar panels out there. I chose 8 WEIZE 100-watt solar panels for our RV because we had the space on top of our rig and they were the cheapest option per watt on the market. We’ve been happy with them!
But it doesn’t end there. You also need:
Solar Panel Mounts
There are a few different ways to mount solar panels to the roof of your RV. The method that you choose is going to depend on several factors, such as: the materials that your roof is constructed with, ease of repair or replacing panels, and functionality that you want to include (such as tilting to get better access to the sun).
Based on our roof construction (aluminum trusses with thin plywood over the top), I chose to secure the panels to the roof using unistrut rails. Other options that may work better for your application include direct mounting (screwing the panels directly into your roof) or 3M double-sided tape mounts.
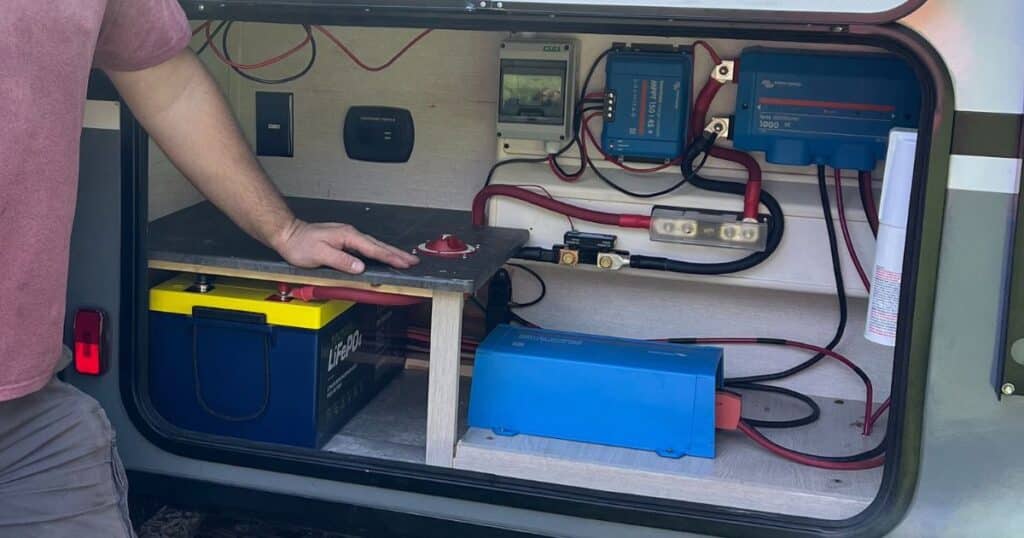
Solar Charge Controller
A solar charge controller regulates the voltage and current coming out of your solar panels into your battery to keep the battery from overcharging. A battery that is overcharged can overheat and catch fire. A solar charge controller is critical for avoiding this and other problems. I chose the Victron SmartSolar Charge Controller, but I recommend exploring this Buyer’s Guide to learn more about your options.
Battery
When your solar panels generate more energy than you’re consuming in your RV, the excess energy gets stored in a battery so you can use it later. The battery gives you a consistent flow of energy to power your RV even when you don’t have access to sunlight.
When it comes to batteries for an RV solar system, you have 3 main options: lithium batteries, absorbed glass mat (AGM) batteries, or lead acid batteries. The biggest differences between the 3 options is the amount of power that you’re able to pull from each type of battery, the weight of the battery, and the price tag.
Here’s how the 3 options stack up:
- Lithium batteries are the most expensive of the 3 options. They are the most lightweight and the most powerful of the 3 types. That’s because you can pull a higher percentage of the available energy out of a Lithium battery than you can with the other types. If there’s room in the budget for a Lithium battery, we recommend getting one.
- AGM batteries are a popular option for RV solar systems because they are less expensive than Lithium batteries and, while not as powerful as Lithium batteries, you can pull a higher percentage of available energy out of them than you can with a lead acid battery. They do weigh significantly more than Lithium batteries.
- I only recommend lead acid batteries if you’re trying to get started with solar power for the least amount of investment possible. Lead acid batteries are heavy. They require maintenance to ensure they keeping working properly. And you can’t pull very much power of them. Plus, there are AGM options out there with a comparable price tag.
I chose this 300 amp hour Lithium battery for our RV because it extends the amount of time we can meet our energy consumption needs without sunlight. It stores up to 3,840 watt-hours of power, which I estimate would allow us to go at least a day and a half without sunlight (and potentially longer if we took measures to conserve energy). We haven’t drained the battery yet and it’s easy to add more battery reserves to your solar setup later if needed.
Shunt
A shunt measures the current that comes in and out of the battery. It’s like a fuel gauge for your RV solar battery, allowing you to be alerted when your battery gets too low. If you don’t care to know how much energy is left in your battery, then a shunt isn’t required. But I think it’s absolutely worth the $100 – $150 to stay informed and avoid damaging your battery. Remember: the battery is often one of the biggest investments in a solar system. Protecting it is worth it.
I chose the Victron Energy SmartShunt battery monitor. It’s bluetooth, which means I can keep tabs on the power level of our battery any time, using an app on my phone.
Inverter
Most of the things in your camper run off of 12-volt electricity. But any appliance you plug into an outlet (like computers, laptop chargers, coffee makers, corded fans, etc.) run off of 120-volt AC electricity (otherwise known as household electricity). To power these 120-volt appliances in a camper, you need an inverter. The inverter takes battery power and inverts it into the 120-volt alternating current that these items need to run.
As you’re shopping for inverters, you want to look for a pure sign wave inverter (as opposed to a modified sign wave) because it helps with more sensitive electronics like computers and phone chargers. I chose this one.
Wiring / Connectors
To connect all the solar components together for a working system, you’re going to need wiring. Wiring is bought in bulk and then you cut it to length, which means that you also need connectors to connect the wiring to the various components. Wiring and connectors may seem like a small thing, but they’re critically important to making sure that your system is safe. You need make sure that the wires you choose are pure copper (copper-coated aluminum is dangerous in an RV).
The type of wiring you need depends on several factors, like the amount the amperage that’s running through your system and the length of wire you need to connect various components to one another. Here’s a resource that you can use to calculate the size of wire gauge you need for your specific application.
Fuses
Fuses are protection devices. They protect your solar system from shorts and component failures that can lead to fires. Again, this may seem like a smaller component, but it’s important to get it right. When you purchase your RV solar components, check the owners’ manual for specifics on the type of fuses you need.
Remember: purchase name-brand, high-quality fuses from manufacturers like Bussmann or Blue Sea Systems for safety. The calculator we recommended above will also give you recommended fuse sizes for your application.
Switches
From time to time you may need to turn off the system for safety, maintenance and repairs. Switches are another place in the DIY RV solar install where you may be tempted to save a few dollars. But don’t do it. I purchased a couple cheap switches off of Amazon and when I opened them to look at them, I didn’t feel comfortable using them in our camper. The switch itself felt flimsy and the terminals on the bottom of the switch were small and very close together.
So, I ended up using switches from Blue Sea Systems, which have some of the best safety ratings out there. Now, when I turn the solar system off to do maintenance or address a problem, I’m confident that the system is actually turned off. It’s a big difference in price, but it’s absolutely worth it because working with electricity can be life or death.
Other Tools
Installing a solar system in your RV is not a job you can do with just your hands or even a simple mechanics toolset. You’re going to need to have all of the following tools on hand to install solar power in your RV:
- Cordless Power Drill
- Wire Cutters
- Wire Strippers
- Wire Crimpers
- Lug Crimpers
- Heat Gun
- Multimeter
Before you install, make sure nothing broke in transit.
I ordered all of the solar components and tools a few weeks before I planned to start the install. I understand that not everyone works this way, but for a complex project like a DIY RV solar install, I highly recommend it.
There are a lot of parts and pieces that go into this project. Finding out that you received the wrong battery (this actually happened to me) is a lot less painful when you find it out before you’ve begun working on the install. By checking that you received the right components and that they’re all working as expected, you’ll set yourself up for a smoother install process.
4. Finish the Job
Complete your install step-by-step.
Every DIY solar install project is going to be unique, simply based on all the factors outlined above. The steps that I took to install solar power in our Coachmen Apex Nano 208BHS are going to be different than the steps that you take. Based on your RV’s floor plan, you’ll place your components in different places than I did. Based on your RV’s roof construction, you’ll mount your solar panels differently than I did. And so on.
When I was doing my research, I had to watch so many different videos and read about so many different people’s experiences to stitch together exactly how to approach my own DIY solar install. So as much as I want to create a one-size-fits-all tutorial video to show you how to do it, it’s just not feasible.
Over the coming weeks, I’ll publish videos that show how I approached each step of project for our specific RV. In the meantime, here, here and here are a few of the videos that I found most valuable as I was preparing to install. These are the basic steps you’ll need to complete to begin powering your RV with energy from the sun:
- Mount the solar panels
- Run the wires
- Secure the components in place (besides the battery, save it for last)
- Wire the components together
- Place your battery
- Wire the battery

Test it to make sure everything works as expected.
Once the install is complete, take some time to make sure that everything is working as expected. Ask yourself the following questions and get some data to find the answers:
- Are the solar panels producing the amount of energy you expected?
- Is the solar charge controller charging the battery as you expected?
- What happens when you turn on all of your appliances? Hopefully, they just stay on.
We tested out the solar system for a couple days in my dad’s backyard before we began our roadtrip out west. We made sure that my wife could work all day in the camper and that the kids could do their homeschool lessons. Finding out there’s an issue with any of your components is much easier to deal with at your home base than it would be while you’re actively RV boondocking.
Continue monitoring performance over time.
Solar power in an RV isn’t a set it and forget it type of project. Make sure you take a look at your components regularly to make sure performance remains high.
A big part of the reason why we chose Victron’s Solar Charge Controller and SmartShunt is because of their superior monitoring capabilities. With a simple bluetooth connection and an app on your phone, you can get all the insight you need to make sure your system is operating efficiently and effectively.
I hope this guide helped give you the confidence that you need to get started with solar power for your RV. My family and I love the flexibility that solar energy has given us as full time travelers. We can’t recommend it enough to other environmentally-conscious and budget-conscious travelers. While the upfront investment in time and money can be high, the rewards are so worth it.
Do you have questions about a DIY solar install that I didn’t answer in this guide? Drop them in the comments and we’ll add them in for you and other readers who probably have the same questions!